Idlis are steamed rice cakes that are part of a traditional South Indian breakfast. India has a varied climate,subsequently the crops that are cultivated vary from region to region.Northern India is subject to chillier climates, here we find wheat to be a primary crop.The southern part of India is warmer and tropical in climate.Rice is more commonly cultivated in these regions.Rice is therefore incorporated into breakfast, lunch and dinner in some form.
Idlis are usually among the first few solid foods given to babies as they are very easy to digest and nutritious too. Once the idli batter is made, a batch of beautiful fluffy white idlis can be steamed up in a matter of minutes.
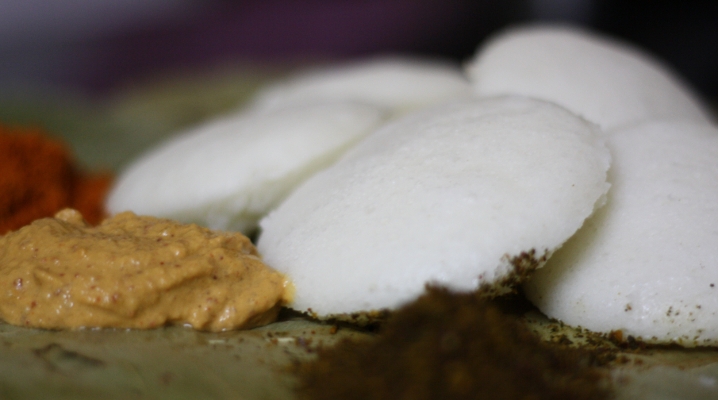
These rice cakes are usually eaten with chutney and/or sambar.Chutney is a spice paste traditionally made with fresh scraped coconut, chillies and tempered with fried curry leaves and mustard. There are innumerable variations of chutney and various kinds are made that do not use coconut as a base. Here in my picture I've served them with
chennikai chutney(peanut chutney),
chutni pudi and kare paaku pudi .
I will be telling you how you can make the idli batter and the peanut chutney.
Chutni pudi - some people call it gun powder is a dry roasted spice powder made with lentils, dried hot red chillies,fragrant curry leaves that have been fried to a crisp and tamarind. More about this in another post to come!
Kare paku pudi or curry leaf powder is similar to Chutni pudi except that it's made with curry leaves as the main ingredient minus the lentil.
Sambar is a kind of stew that is an integral part of a south Indian meal. The sambar maketh the meal shall I say? It's made with lentils and vegetables that are spiced with coconut, dried red chillies, coriander seeds, cumin seeds, fenugreek seeds and so on.
A good idli should be light and airy and have a slight tang from just the right amount of fermentation. Needless to say they turn out better when the weather is warmer and the batter ferments overnight easily.But this can be easily remedied with a few tips that I can share with you.
The type of rice and lentil makes a difference as well. Here I give you the recipe that I make every weekend and it has turned out to be a keeper - producing beautiful idlis each time.
But they still don't compare to the best idlis in the world - in my opinion are the ones that I ate a couple of years ago at Murugan's Idli shop in Chennai. Now I'm a hardcore Bangalore foodie.But this one has to go to Chennai.
 Ingredients
3 cups Boiled rice/Kusalalkki
1 cup raw rice(you can use idli rice instead if you can get your hands on it)
1 heaped cup of black gram dal/Urad dal
2 closed fistfuls of beaten rice/avalakki( do not worry if you have giant sized man hands - it'll all work out)
salt
Method1) Measure both kinds of rice into a bowl and wash under cool running water 3- 4 times. Remove any impurities that float about.soak with sufficient water - such that the water level is 4 inches above the grains.
2)Measure the urad dal into a separate bowl and wash under cool running water 3- 4 times. Remove any impurities that float about.Then add the beaten rice that has been gently rinsed to the urad dal.Gently rinse because if you are mean to it you're gonna end up with a mush that is going to run down the sink. Soak with enough water such that the water level is 4 inches above the lentil.
3)Leave to soak overnight or for at least 8 hrs.
4)After the soaking period is done and over with you can start with grinding the batter. Note :if you cannot grind the batter at this stage you can refrigerate the soaked rice and dal for up to 24 hrs.
5)Grind the urad dal + beaten rice to a fluffy batter. Use the water that you soaked the dal in. The way to check if you're urad has indeed been ground well is to drop a tiny spoonful into a dish of cold water and you should see the batter quickly rise and bob up to the surface of the water. If it sinks or is really being lazy to get up there - keep grinding. Make sure you use the water generously. The batter shouldn't be to runny but neither do you want to ruin your mixer by heating it up. Once you do this a couple of times you'll just know how much water is the best.
6)Grind the rice separately. The rice doesn't have to be ground to a fine batter.If you leave it slightly coarse your idlis will have a great texture and you can see the little bits of rice suspended uniformly in the steamed urad.
7)In case some of you did not take note of it - it is very important that you always soak the rice and dal separately and grind them separately. Never try to grind or soak them together to cut the time and effort.They grind up differently take different amount of water and have different grinding times as well.
8)Mix the two batters together and leave covered in a warm place overnight.The next day the batter would have risen in level and you'll find tiny bubbles at the surface.
Woo hoo! your batter turned out perfect. If not don't lose heart.It's probably a little colder where you live; try moving the batter closer to your stove or a warmer place and share the disappointing news with you family.Dashing all their hopes for an idli breakfast that will now turn into an idli brunch.Wait for a couple more hours.Look at tips section.
9)Once you batter is ready you can add the salt just before making the idlis.Pour into greased idli molds.the batter should be a little thicker than a pouring consistency.
10)Steam - NOT pressure cook the idlis.Which means always remember to take off the gasket or the thick rubber bandish thing from underneath your pressure cooker lid.And no weight either. Steam for about 10-12 mins.Leave undisturbed for 5 minutes before unmolding.And try to keep your curious husband from peeking into every 2 mins to check if they are ready.
11) The end. Not really.Check out the tips section for additional pow wow on making good idlis.
12)May the idli gods shine down upon you.
Tips1)You can use a special kind of rice available in some stores called idli rice.The grains are shorter and rounder than the regular rice that we eat.Using this rice makes the idlis softer and better.But don't go crazy looking for it.The recipe works just fine with regular rice as well.
2)If you live in an area that is really cold a sure shot way of getting your batter to ferment is to turn on you oven for about 2 mins at the lowest setting 170 F.Switch off and then after 5 minutes place your batter inside the oven.Leave the oven light on.The heat radiated from the light helps the batter ferment.
When you do this it would be wise to place a cookie sheet or some sort of larger dish underneath to collect any spills in case your batter bubbles up and overflows.