Tuesday, July 28, 2009

In the pink of health

Or should I say the blood red of health?Distilled magenta or maybe the deepest darkest hue of pink imaginable?The pomegranates that I recently bought were beautiful.They warranted a color of their own.
Pomegranates are rich in anti-oxidants,Vitamins A and C,folic acid and other minerals.There is a pomegranate juice craze out there - with researchers saying pomegranate juice prevents cancer,heart disease, Alzheimer's and dental plaque even! So,you've got yet another good food to add to your grocery list of must buys.

The below picture is my entry for Click! the monthly food photography event hosted by the wonderful Jai and Bee of JugalBandi - the lifestyle blog that has incredibly inspirational recipes and photos.Take a look!
  • Click - Bi Color


  • Pomegranate caviar for JugalBandi's Click!


    I made a simple dalimbe heasrubele kosambari with the pomegranate.The result was an extremely vibrant and colorful salad that looked almost too good to eat.I stared at it for a very long time and even swatted away my two year old's hands when he tried to steal(eat) some of it.

    Kosambari is a traditional Karnataka/Kannadiga salad recipe that has split green gram dal,finely chopped cucumber,fresh coriander,lemon juice and grated fresh coconut.It is then tempered with a tadka of red/green chillies and curry leaves.You'll almost always find it served at most kannadiga weddings.

    In Bangalore, on the festival day of Ram Navami, where the birth of Lord Rama is celebrated, small helpings of hesarubele kosambari and glasses of panaka are handed out for free at stalls all over the city.Panaka is a refreshing drink made with jaggery and lemon juice with a hint of cardamom in it.Sounds simple but tastes divine on a hot sweltering summer afternoon.Leaves you feeling rejuvenated and saint like.


    PomegranateWhole

    I've eaten versions of this salad that deviate from using the traditional ingredients.Let's see now..... there was corn kosambari, mavinkai(raw mango) kosambari and even a draakshi(dried grape) kosambari.Here is my recipe for a dalimbe or pomegranate kosambari.The yellow of the hesarubele complements the beautiful red of the pomegranate pearls.The fresh green corriander and snowy white grated flecks of coconut brings out the true kannadiga flavor in this simple salad and adds to the riot of colors.It looks good.Is good for you and yes very simple to make.

    The following is my entry to
  • Food In Colors - Express your mood by Sunshinemom
  • It's a great concept and she has some great vegetarian recipes - take a peek!

    Pomegranate kosambari

    Recipe

    Ingredients

    1/2 cup of split yellow moong or green gram dal
    1 pomegranate
    2 tsps of finely chopped coriander/cilantro leaves
    2 tsps of grated coconut
    1/2 lime juiced
    1/4 tsp of mustard seeds
    2 red chillies
    6-8 curry leaves
    a pinch of hing
    1 tsp of oil
    salt to taste

    Method

    1)Wash the moong and let it soak in water for 2 hours.
    2)Separate the pomegranate kernels without squishing them.
    3)Drain the moong and keep aside.Gently mix this together with the pomegranate.
    4)For the tadka - heat the oil in a small pan and toast the mustard seeds, red chillies and curry leaves.Add a pinch of hing to the hot oil.Remove from the flame and put over the salad.
    5)Add salt and lime juice to taste.
    6)Finally add the grated coconut and the chopped coriander.
    7)Serve immediately or chill up to 1 hr.
    Note - if you want to make this beforehand do not add the salt and lime juice until just before eating.If left to stand after the addition of salt, you'll end up with a very unappetising pink watery salad as the salt draws out all the juices of the fruit.Not pretty.

    Dalimbe hesarubele kosambari

    P.S - To my dear friend P - this dish is vegan!Hope you have a chance to try it out.

    Sunday, July 26, 2009

    Beta carotene powerhouse - the pumpkin

    Pumpkins are naturally chock full of vitamins, anti -oxidants,alpha and beta carotene.They are low in fat and calories but exceptionally nutrient dense.Which means they are very good for you.Pumpkins are loaded with vitamin A, are a good source of vitamins C, K, and E, and lots of minerals, including magnesium, potassium, and iron.A single serving of pumpkin provides 245% of your recommended daily intake of Vitamin A!

    I never ate pumpkin until I was married into S's family as we never cooked pumpkin at my mother's place.But I took one bite of this subtly flavored and gently stir fried dish and boy was I hooked onto it! Later when we moved to the US,I went pumpkin pie crazy and the holiday times were horrid.With all the pumpkin pies slowly helping me morph into a pumpkin myself!

    Yerra gumidikai (red pumpkin) koora

    But here's a healthier way to enjoy this vegetable(or is it a fruit?).After a quick Google search and was relieved to find that there were a zillion results with the same question.It's a fruit!
    The pumpkin-y flavor in this dish is not overwhelmed with the spices and you can taste the goodness and natural sweetness of the caramelized pumpkin bits.Cubes of pumpkin are tempered with red chillies,cumin,mustard,curry leaves and wait.... the special ingredient that takes this dish to another level is jaggery.Have I ever told you just how much I love jaggery? I'm addicted to the stuff.I scrape off little portions from the block and nibble on them all day long.

    What is jaggery? it's best that you don't know or you'll turn into an jaggery crazed monster like me.But I'll let you in on this little secret - it's way better than sugar.
    From wikipeida and other sources - "This type of sugar is considered unrefined and is produced by boiling raw sugar cane or palm juice in iron pans. Because it does not go through additional processing, it retains some of the natural vitamins and minerals of the ingredients used.Many people consider jaggery healthier than more refined sugar since it is less stripped of natural nutrients.Although the Merriam-Webster dictionary defines it as `unrefined sugar from palm sap', the word jaggery is used for the products of both sugarcane and the palm tree. Jaggery is considered beneficial to health by the traditional medical system of Ayurveda."

    Before this post turns into a story about my love for jaggery, let's get on to the recipe. This dish pairs well as a side for steamed rice and roti.Eat up and feel good!With all of that vitamin A I can see better already......now where did I put that pumpkin pie recipe......no don't worry I'll replace all the sugar with the jaggery.Evil me.

    Recipe

    Ingredients

    250 gms or 1/2 lb of red pumpkin cubed
    jaggery - a lime sized ball
    2-3 red chillies broken and deseeded
    2 tsp finely chopped onion
    1/4 tsp mustard seeds
    1/4 tsp cumin seeds
    1/4 tsp turmeric powder
    6-8 curry leaves
    a pinch of hing/asafoetida
    1 tsp oil
    salt to taste

    Method

    1)Remove the rind of the pumpkin and discard.Remove the seeds as well.Cube the pumpkin and rinse in water.
    2)Heat the oil in a pan and add the mustard,cumin seeds and red chillies.When they begin to splutter add the curry leaves, onion and hing.Saute until an aroma is given off and the onions are soft.
    3)Add the pumpkin cubes and stir well so the tempering coats the veggie uniformly.Add the turmeric and salt to taste.Stir fry for about 1 min.
    4)Add 1/4 cup of water.Cover and cook for 3 mins.(Or less if the pumpkin is tender).When the pumpkin is fork tender add the jaggery and bring to a boil.
    The jaggery should melt and form a thick golden syrup.Be careful not to overcook the pumkin or it gets mushy and pasty. You want the cubes to still hold the shape inspite of being soft cooked.
    5)Serve hot with rice or roti.

    Thursday, July 23, 2009

    A simple lunch

    Lunch at home typically consists of sambar,rice and a vegetable side.In this picture you're looking at drumstick sambar and curried yam.Today I'm going to share the recipe for the sambar.Best of all you don't need sambar powder for this one.You can make your own in a pinch!

    A simple lunch

    Sambar is typically the main entree for most south Indian meals.It is a thick stew made with lentils,vegetables,coconut in some cases and spices such as chilli,turmeric,cumin,coriander and so on.The lentils are a rich source of protein and when eaten with rice gives you the benefit of a complete protein.Southerners in India are largely vegetarian.

    You would typically find drumstick,brinjals,white pumpkin,radish and okra used as vegetables in a traditional sambar.That reminds me of a weird story I heard from my husband about a bachelor friend who makes his sambar with Brussels sprouts and broccoli!
    That's as eclectic as bitter gourd lasagna to me.

    What really brings out the authentic flavour of the sambar is the magical and fragrant curry leaf.It is a commonly grown plant with a hard woody stem and it's leaves are used widely in Indian cuisine.It also has various benefits.
    Here's a picture of a fresh bunch of vibrant green curry leaves that I picked up from the market today.

    MagicalCurryLeaf

    Now everyone makes their own version of the sambar powder and you can even get some good store bought ones like MTR. This version really just uses some basic spices from your pantry and as the masalas/spices are fresh the sambar turns out real well. And no grinding as I don't use coconut in this version.

    Recipe

    Ingredients

    1/2 cup split red gram dal (toor dal)
    2 cups vegetables cut into slightly large pieces(drumsticks,brinjals,okra,white pumpkin)
    4 cups water
    1/2 onion chopped fine

    Spices

    1/2 tsp turmeric powder
    1 1/2 tsp red chilli powder
    1 tsp coriander powder
    1/4 tsp methi powder
    a pinch of hing/asafoetida
    1/2 tsp black mustard seeds
    1/2 tsp cumin seeds
    1 lime sized ball of tamarind soaked in hot water for 1/2 hr or nuke in the microwave for 30 secs
    1 tomato cut into 8 pieces
    10-12 curry leaves
    2 tsp peanut oil

    Method

    1)Pressure cook the dal with 2 cups of water with a pinch of turmeric and a few drops of oil. Let it cook for 1 whistle and then simmer and cook on low heat for 5 mins more.Let the pressure completely die down before you venture into opening the cooker lid.
    2)Once the dal is cooked you can start with the tadka.In the meantime you can mix together your own sambar powder - mix the chilli,coriander,methi and turmeric powders.Keep aside.This is your sambar powder.
    3)For the tadka or tempering - heat 2 tsp of oil in a heavy bottomed(giggle giggle) vessel.Add the mustard and cumin seeds.When they start to splutter add the fresh curry leaves and a tiny pinch of asafoetida.Roast till an aroma is given off.then add the finely chopped onion and saute until lightly golden brown and soft.
    4)Add the cooked dal and then the vegetables of your choice. If you are using okra fry the okra for about 5 mins in a tsp of oil to prevent it from making the sambar slimy.Quickly stir in the spice mixture and add salt to taste.Add the remaining water to bring the sambar to a pouring consistency.
    5)Bring the sambar to a boil for 5 mins or until the veggies are half cooked.At this point add the tomato and the tamarind pulp.Do not add these ingredients earlier as they would prevent the dal from breaking down and melding together with spices and veggies.
    6)Cover and cook for 10 mins on a low flame. Check for salt and sourness.The dal should have completely cooked down and the veggies should be fork tender.
    7)Serve with rice/idli or dosa. Oota is ready!

    Saturday, July 18, 2009

    Patra ni macchi

    PatraNiMacchiIMG_0542

    The name of this dish translates to "fish wrapped in a leaf" .Patra ni macchi is a traditional Parsi dish that has fish wrapped in a spicy marinade made with ground coconut, fresh mint, coriander leaves, fresh green chillies and lemon juice. It's succulent and moist with the juices of the fish intact and just bursting with all the flavors of the sea. The banana leaf lends this dish a subtle smoky flavor that I like.

    I only make this dish when I have really fresh fish and fresh green giant banana leaves on hand.Steamed fish mandates that the fish be extremely fresh or you're going to wind up with a dish with a strong fishy odor.Not pleasant.

    Now, if you're not very into steamed fish (Or steamed anything - like my husband) I would still give this a try. Especially when you're entertaining, cause the whole fish wrapped in banana leaves makes an impressive presentation.You could leave the fish in the leaf parcels and let your guests open them at the dinner table.Plus it doesn't take a whole lot of time to prep or steam the fish.

    Serve on a bed of hot fluffy steamed rice. Since it is fish - you can feel real good about getting all your protein and omega3 fatty acids. You could also grill or barbecue the fish parcels and if you can't find banana leaves where you live - use foil or better still grill them just as they are.

    Here I've used Surmai or Kingfish. But a whole Pomfret or a Red Snapper would work just as well.

    PatraNiMacchiRice

    Recipe

    Ingredients

    1/2 kilo or 2 lbs of Kingfish/Pomfret/Red Snapper
    1 cup fresh scraped coconut
    3 cups fresh coriander leaves
    20 fresh mint leaves
    8 green chillies
    1 lemon - juiced
    1/2 tsp cumin seeds
    1/2 inch piece ginger
    6 cloves of garlic
    salt to taste
    banana leaves
    kitchen string/twine

    Method

    1)Clean the fish and keep aside.If you are using the whole fish make deep incisions or score the fish on both sides to help the fish marinate better.
    2)Make the marinade. Grind together the coconut, coriander and mint leaves, chillies,cumin seeds,ginger,garlic, lemon juice and salt.Taste the marinade. Take care not to add too much water as you don't want a runny marinade.The fish also releases some of it's juices so you want to keep the marinade thick.
    3)Smear the fish generously with the marinade.Leave aside for up to 1 hr.
    3)Wash and cut the banana leaves so you have one for each fish steak/fillet. If you're using the whole fish rub the insides of the fish with the marinade as well.
    4)Gently wrap the fish with the banana leaf and use the kitchen string to help secure the leaves around the fish.
    5)Steam/Grill the fish for about 10- 12 minutes depending on how thick your fish is.Serve hot with a squeeze of fresh lemon juice.

    Friday, July 17, 2009

    Fried eggs


    I'm going to keep this post short and simple.Just like the recipe.It has very few ingredients and tastes divine with plain steamed rice or on buttered toast.Up the heat by increasing the red chilli powder!

    Ingredients

    6 soft boiled eggs, shelled
    3 tsps of red chilli powder
    1/2 tsp of turmeric powder (optional)
    3 tbsps of oil
    salt

    Method

    1) To soft boil eggs - start by dunking the eggs in cold water and then bring to a boil for about 7-8 mins.Never put the eggs into water that has already been boiling as this results in a dark ring being formed around the egg yolk and it doesn't yield a uniformly cooked egg.
    2)Shell the eggs.Make a thick paste with the salt, chilli powder and turmeric powder with a few drops of water.The turmeric is optional if you don't have any, don't worry about it.
    3)Cut the eggs into halves and smear the paste generously all over the egg.
    4)Heat the oil - it should be hot but not smoking. Gently slide the eggs in and lower the heat.
    5)Cook on both sides until a slightly crispy skin is formed.Serve immediately.

    It's really simple to make but tastes fantastic.

    Tuesday, July 14, 2009

    An ode to the idli


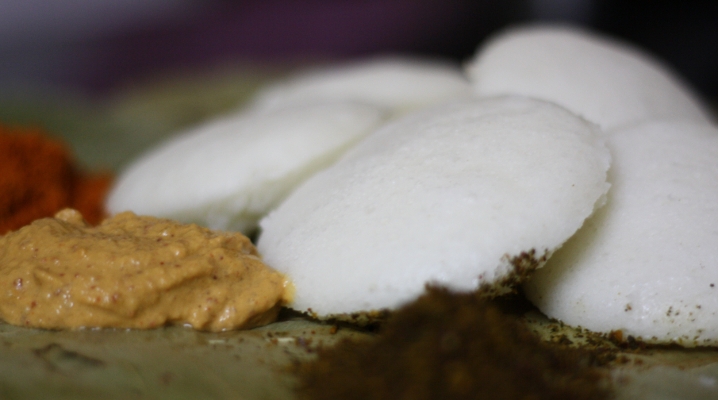
    Idlis are steamed rice cakes that are part of a traditional South Indian breakfast. India has a varied climate,subsequently the crops that are cultivated vary from region to region.Northern India is subject to chillier climates, here we find wheat to be a primary crop.The southern part of India is warmer and tropical in climate.Rice is more commonly cultivated in these regions.Rice is therefore incorporated into breakfast, lunch and dinner in some form.
    Idlis are usually among the first few solid foods given to babies as they are very easy to digest and nutritious too. Once the idli batter is made, a batch of beautiful fluffy white idlis can be steamed up in a matter of minutes.
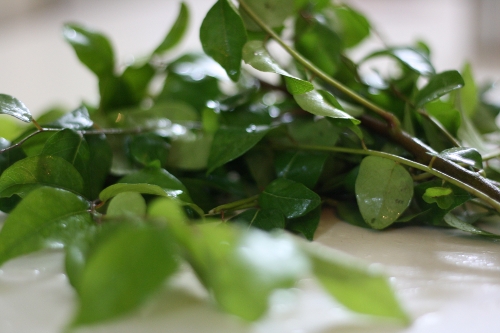
    These rice cakes are usually eaten with chutney and/or sambar.Chutney is a spice paste traditionally made with fresh scraped coconut, chillies and tempered with fried curry leaves and mustard. There are innumerable variations of chutney and various kinds are made that do not use coconut as a base. Here in my picture I've served them with chennikai chutney(peanut chutney), chutni pudi and kare paaku pudi .
    I will be telling you how you can make the idli batter and the peanut chutney.
    Chutni pudi - some people call it gun powder is a dry roasted spice powder made with lentils, dried hot red chillies,fragrant curry leaves that have been fried to a crisp and tamarind. More about this in another post to come!
    Kare paku pudi or curry leaf powder is similar to Chutni pudi except that it's made with curry leaves as the main ingredient minus the lentil.
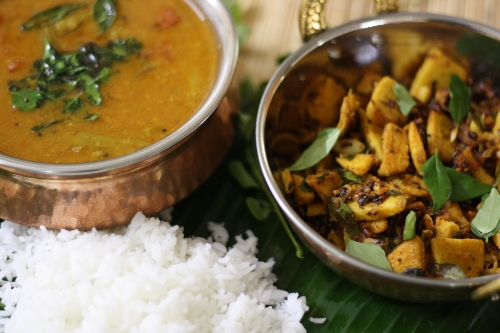
    Sambar is a kind of stew that is an integral part of a south Indian meal. The sambar maketh the meal shall I say? It's made with lentils and vegetables that are spiced with coconut, dried red chillies, coriander seeds, cumin seeds, fenugreek seeds and so on.

    A good idli should be light and airy and have a slight tang from just the right amount of fermentation. Needless to say they turn out better when the weather is warmer and the batter ferments overnight easily.But this can be easily remedied with a few tips that I can share with you.
    The type of rice and lentil makes a difference as well. Here I give you the recipe that I make every weekend and it has turned out to be a keeper - producing beautiful idlis each time.

    But they still don't compare to the best idlis in the world - in my opinion are the ones that I ate a couple of years ago at Murugan's Idli shop in Chennai. Now I'm a hardcore Bangalore foodie.But this one has to go to Chennai.


    Ingredients

    3 cups Boiled rice/Kusalalkki
    1 cup raw rice(you can use idli rice instead if you can get your hands on it)
    1 heaped cup of black gram dal/Urad dal
    2 closed fistfuls of beaten rice/avalakki( do not worry if you have giant sized man hands - it'll all work out)
    salt

    Method

    1) Measure both kinds of rice into a bowl and wash under cool running water 3- 4 times. Remove any impurities that float about.soak with sufficient water - such that the water level is 4 inches above the grains.
    2)Measure the urad dal into a separate bowl and wash under cool running water 3- 4 times. Remove any impurities that float about.Then add the beaten rice that has been gently rinsed to the urad dal.Gently rinse because if you are mean to it you're gonna end up with a mush that is going to run down the sink. Soak with enough water such that the water level is 4 inches above the lentil.
    3)Leave to soak overnight or for at least 8 hrs.
    4)After the soaking period is done and over with you can start with grinding the batter. Note :if you cannot grind the batter at this stage you can refrigerate the soaked rice and dal for up to 24 hrs.
    5)Grind the urad dal + beaten rice to a fluffy batter. Use the water that you soaked the dal in. The way to check if you're urad has indeed been ground well is to drop a tiny spoonful into a dish of cold water and you should see the batter quickly rise and bob up to the surface of the water. If it sinks or is really being lazy to get up there - keep grinding. Make sure you use the water generously. The batter shouldn't be to runny but neither do you want to ruin your mixer by heating it up. Once you do this a couple of times you'll just know how much water is the best.
    6)Grind the rice separately. The rice doesn't have to be ground to a fine batter.If you leave it slightly coarse your idlis will have a great texture and you can see the little bits of rice suspended uniformly in the steamed urad.
    7)In case some of you did not take note of it - it is very important that you always soak the rice and dal separately and grind them separately. Never try to grind or soak them together to cut the time and effort.They grind up differently take different amount of water and have different grinding times as well.
    8)Mix the two batters together and leave covered in a warm place overnight.The next day the batter would have risen in level and you'll find tiny bubbles at the surface.
    Woo hoo! your batter turned out perfect. If not don't lose heart.It's probably a little colder where you live; try moving the batter closer to your stove or a warmer place and share the disappointing news with you family.Dashing all their hopes for an idli breakfast that will now turn into an idli brunch.Wait for a couple more hours.Look at tips section.
    9)Once you batter is ready you can add the salt just before making the idlis.Pour into greased idli molds.the batter should be a little thicker than a pouring consistency.
    10)Steam - NOT pressure cook the idlis.Which means always remember to take off the gasket or the thick rubber bandish thing from underneath your pressure cooker lid.And no weight either. Steam for about 10-12 mins.Leave undisturbed for 5 minutes before unmolding.And try to keep your curious husband from peeking into every 2 mins to check if they are ready.
    11) The end. Not really.Check out the tips section for additional pow wow on making good idlis.
    12)May the idli gods shine down upon you.

    Tips

    1)You can use a special kind of rice available in some stores called idli rice.The grains are shorter and rounder than the regular rice that we eat.Using this rice makes the idlis softer and better.But don't go crazy looking for it.The recipe works just fine with regular rice as well.
    2)If you live in an area that is really cold a sure shot way of getting your batter to ferment is to turn on you oven for about 2 mins at the lowest setting 170 F.Switch off and then after 5 minutes place your batter inside the oven.Leave the oven light on.The heat radiated from the light helps the batter ferment.
    When you do this it would be wise to place a cookie sheet or some sort of larger dish underneath to collect any spills in case your batter bubbles up and overflows.

    Tuesday, July 7, 2009

    A sweet start - Phirnee

    What is Phirnee? It's an Indian version of rice pudding that's flavoured with Indian spices and made with good Basmati rice. I use cardamom here.

    Phirnee_matki1

    This is my go to recipe for a not so greasy finale to an Indian meal when we entertain. It's easy to put together and tastes like you've spent hours on the stove making it, but it's actually a breeze to make!

    I'm sure everyone has their own version of Phirnee.Why it's even spelled in a number of different ways - Firnee, Firni, Phrini and so on. But most recipes definitely have fragrant Basmati rice, milk and sugar as a base. Then you can put your own spin on it by varying the spices or adding nuts or dried fruit.

    My mother makes a version of Phirnee that's rich but not in a cloying sort of way. Phirnee at home is a Sunday affair or reserved for special occasions when we have guests at home. A typical Sunday lunch would consist of Chicken Biryani, dry fried chicken, peppery mutton chops, some cucumber pachadi to help cool the taste buds from all the spices and chillies, plain steamed rice with pepper rasam to help digest the enormous meal!
    But everybody still had room for Phirnee. My mother's Phirnee differs from the way I make it in many ways.She uses khova that imparts richness to the dish and helps thicken the phirnee. Khova is the result of heating milk on a slow steady flame for long hours with frequent stirring.She does not grind the rice to a paste and adds it whole instead.
    Delicious as it was, it also took hours to make and the recipe devours quarts of whole milk, khova, sugar and ghee(clarified butter), cashew nuts and raisins all simmering away in a huge cauldron shaped vessel. It also needs constant attention like my 2 year old on a bicycle lest it should burn or turn out be lumpy. But it sure was a hit with everyone and she was constantly reminded and asked to bring some to parties and gatherings. My mum's a fabulous cook.

    Phirnee_matki2

    My version of Phirnee is quicker to make and can be whipped up with ingredients that are easily found in your pantry. It is not heavily spiced or calorie laden.But it sure puts a smile on your face.

    It is essential that you use good quality Basmati rice as this is what brings out the "Indian-ness" of the dessert.

    Recipe

    Ingredients -

    2 Litres Whole milk
    1/4 cup Basmati rice
    3/4 cup sugar
    3-4 cardamom pods
    1/4 cup Pistachio

    Method

    1)Bring the milk to a boil over a low flame. Take care so as to not burn the milk. It is advisable to use a thick bottomed vessel for this purpose.
    Ensure that the vessel is larger in volume than the amount of Phirnee you intend to make.(the hot milk would overflow otherwise)
    2)Wash the rice in cold running water. Drain the water and let the rice dry for a couple of minutes.Do not soak the rice in water as this would make the Phirnee gummy.
    3)Grind the rice with a couple of teaspoons of cold water.The paste does not have to be too fine.It needs to be granular as this is what gives the Phirnee a slightly chewy and nutty texture.
    4) Lower the flame and slowly add the rice paste to the milk stirring all the time to prevent any lumps in the Phirnee.
    5)Let the rice cook in the milk and you will feel the consistency starting to change and thicken in about 5 minutes. Continue to stir. The rice needs to be thoroughly cooked but does not have to dissolve into a mush.
    6)Add the sugar at this point.If the Phirnee is too thick you can add some milk to thin it out. Be warned that this dessert gets thicker on cooling. The final consistency when it is served should be creamy . Not too runny or stiff.
    7)Remove the Cardamom husk/skin and powder the seeds.Turn off the flame and stir in the cardamom powder.
    8)Let cool slightly before transferring to your serving dish.Chill for at least 4 hours or more in the refrigerator.
    9)Before serving - mince the pistachio and sprinkle on top of the Phirnee.
    Options - you could also turn this into a Rose Phirnee by omitting the cardamom and adding some Rose powder instead. Rose powder is made with edible rose petals that are dried and then ground to an ultra fine powder. Garnish with fresh edible rose petals or Gulkand (candied Rose petals). this results in beautiful ever so slight hue of pink that looks irresistible. A teaspoon
    of Rose water or gulab jal makes it even rosier and fragrant.
    You could add almonds instead of Pistachio.There are endless versions of the Phirnee that you can make with this basic recipe.

    As an added note I served my Phirnee in earthen bowls or matkis.Matkis are made with clay and mud and it soaks up a lot of water helping the Phirnee set more easily and uniformly. It also lends an earthy flavour and aroma that I can't describe. It almost captures the essence and smell of fresh rain pouring down on the parched dry playground at school. Lovely.

    If you do go out to buy some of these earthen bowls make sure you soak them in a bucket of water overnight to remove impurities, dust and grime.It also helps the matkis soak up some water so whatever you put into them isn't zapped out of moisture completely.